I love Pinterest!! I found these cute little bunnies and had to make them. The only trouble is the pattern isn't in english, but it was actually easy to work out as it is only single crochets, increases and decreases.
I made the green one first which was cute, and then the purple one. I ran out of the darker purple and had to use a slightly lighter shade for the ears - that's what I get for using leftover balls of wool. I also think the nose on the purple one is a bit big, so the next one will be smaller. I'm currently working on a super soft baby pink one which my daughter has her eye on.
Showing posts with label Crochet. Show all posts
29 Aug 2016
24 May 2016
TINYCORN!!
These are just tooooo cute! A friend wanted a rainbow unicorn for her rainbow baby but the pattern she originally saw was too big for me to say I'd do it. Then I saw this super cute unicorn by ahooka'migurumi who has some great patterns. This one is in a free e-book of 8 patterns. Well worth looking at.
My biggest issue was getting the right yarns. The white is a baby wool, the tail/mane is cotton (I was able to get a small pack of mini yarns so I didn't have to get 7 50g balls). The tricky bit was the horn/hooves. I tried a few different silver crochet threats but in the end I went with some cross stitch thread. It was a very tricky bit to do as its only3 sc around, but I managed to do it...twice. I also had to try a couple of different eyes but found these at David's Emporium.
Of course, once I had these 2 I had to make a rainbow turtle friend for them :) (tiny striped turtle)
Finished chevron blanket
I actually managed to get it all done, all the little triangles finished and all the ends sent in. I had grand ideas of how I was going to join all 4 sections but in the end I did 2 rows of single crochet around each section then single crocheted them together. It's nice and big and super cosy. It's rather heavy but it will be perfect to snuggle under this winter.
16 Mar 2016
Chevron crochet blanket
I wanted to try out a chevron pattern so had a good look through Pinterest. There were some that just looked too difficult, but this one had a cool ridge detail as well that comes about naturally with the pattern. I used this one from Eat, Knit & DIY, though I changed how she fills in the triangles at the ends. I decided to follow the original pattern to keep it all looking uniform. I started just following the pattern size with a view to giving it to Beanies for Babies, but I fell in love with the colours and have ended up making 4 of the pattern and I will join them all into one big blanket.
The pattern for my end triangles mostly follows the pattern so if you've got the pattern sorted this should be easy to follow, but I'll put down how I count it out. I'm going to sc around the edge a couple of times which should make the edges look much tidier. The space you are going to fill looks like an inverted triangle with the point at the bottom. From this bottom point count 12 sc up the right side and join the wool and ch1 (this is like the first sc).
Working back toward the bottom point:
sc10, sk1, sc11, ch1 turn
sc8, sk2, sc8, sk1, ch1 turn
sc6, sk2, sc6, sk1, ch1 turn
sc4, sk2, sc4, sk1, ch1 turn
sc2, sk2, sc2, sk1, ch1 turn
sc1, sk1, sc1, slst1, finish off
9 Sept 2015
Crochet Pugs
These cute little guys were first introduced to me by my husband sending me this link. When I was younger we had 2 pugs, one of each colour, so they had to be made! I used some other patterns I had and kinda made it up and ended up with these cute guys. The lighter one is made with 12ply Acrylic and the black one 8ply wool so the black guy is a little smaller.
![]() |
| Sooo cute!! |
![]() |
| Stack-a-pug |
![]() |
| They are in a little pouch ready to be posted to their new home. |
21 Nov 2013
A 5th birthday party - part 1
My little girl is turning 5 this year. Where has the time gone? Of course this has to big a big party so I had to get started early.
Thankfully she decided on a mermaid theme early and hasn't changed her mind, so I started with a few crochet creatures to get the creative juices going.
The pattern was taken from here. I have since added another octopus, another fish and an orca.
The next thing I thought about was the cake. I had seen a few I liked on Pinterest and decided that there would be blue buttercream icing with fondant coral/seaweed on top. I got myself some gum paste mix at Spotlight and had a go at mixing it up. I have never worked with gum paste before but this was pretty easy to make. After last year with the marshmallow fondant I figured this would be a piece of cake, but it's trickier doing 3D shapes. The first lot sank on itself as the mix was too soft, so the next time I used toothpicks to hold it up. I am slowly improving and plan to try a pillow for a little Ariel doll to sit on.
![]() |
| Lots of coral and seaweed |
Then I thought I'd better get on to the invitations. I had a pretty good idea of what I wanted and little girl agreed. I wish I had a colour printer here in Perth, but I don't so I had to go old school and draw with a coloured pencil and glue on cut outs.
| Chloe wrote the names on Post It notes so mistakes could be easily re-done |
Added to the pile was a treasure chest (see top pic) to be filled with chocolate coins. I am also in the process of making scallop shell goodie bags so will post pics when they are done. Only 3 1/2 weeks to go and little boys 3rd birthday the day before, and he has been requesting a dinosaur cake...
5 Sept 2013
Crochet Hootabelle
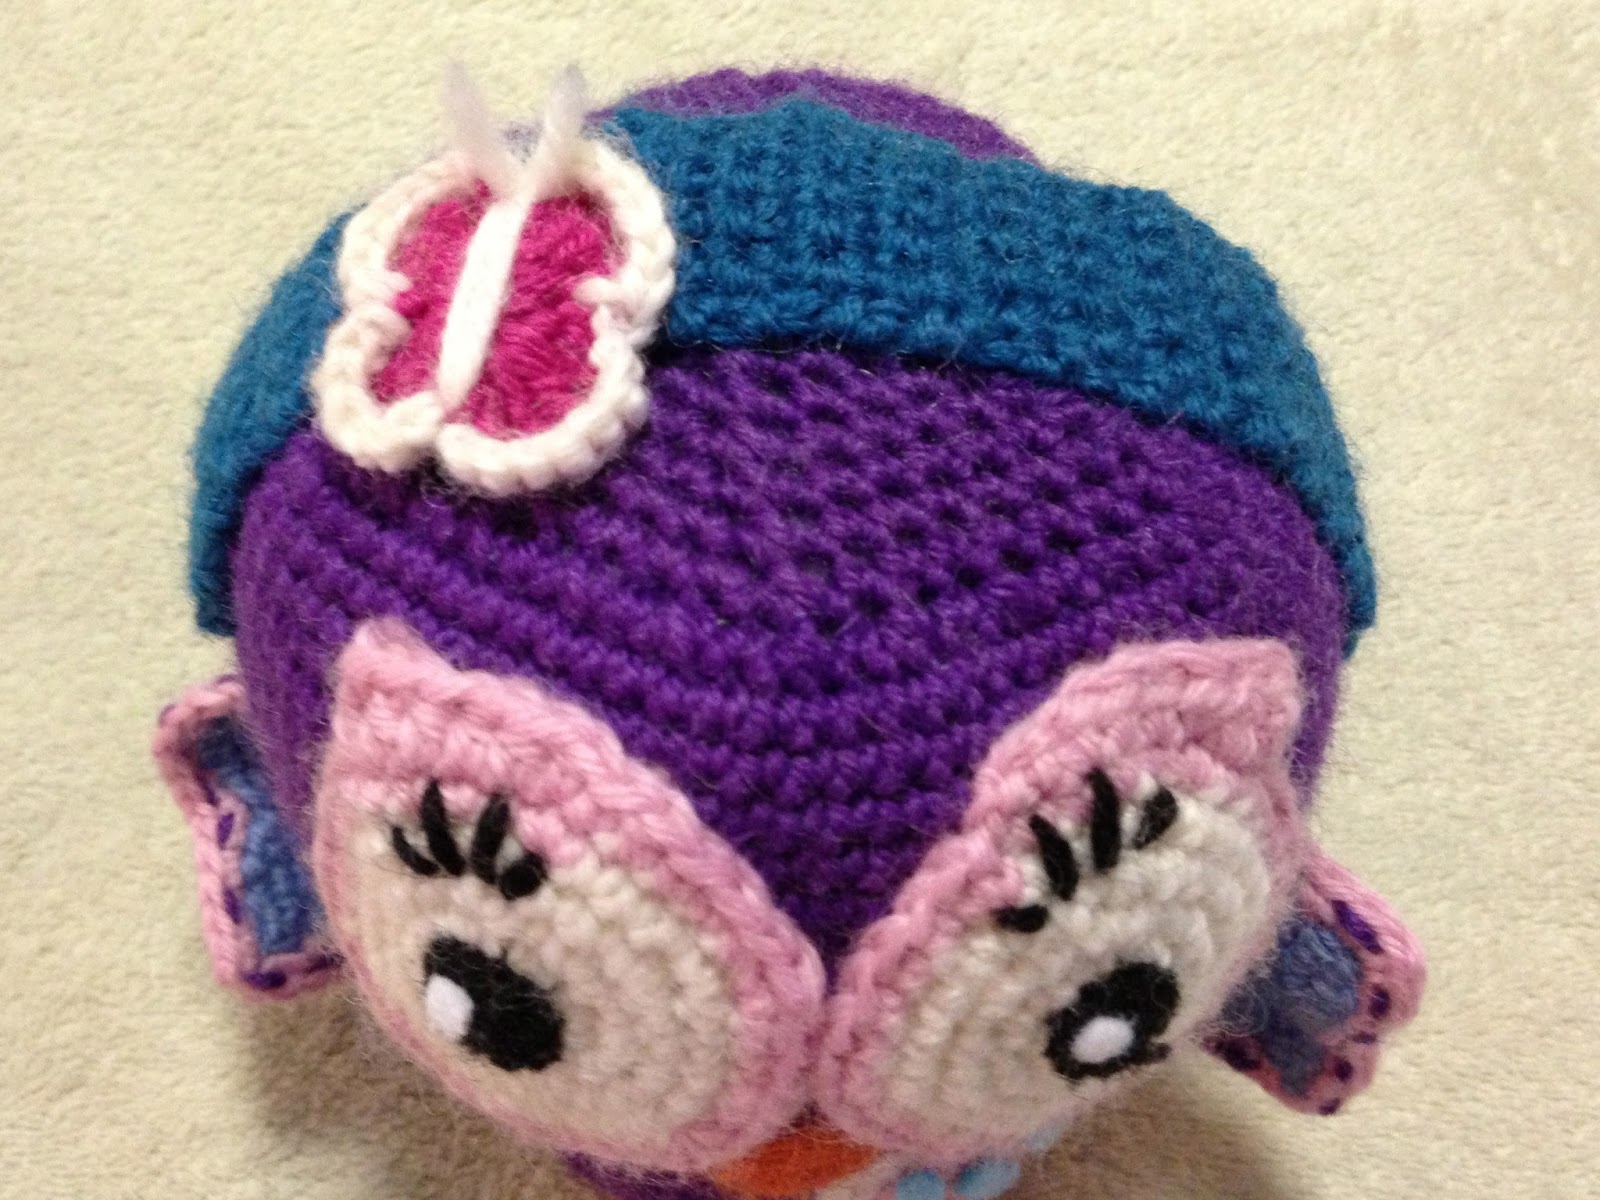
It took a while but I managed to finish Hootabelle, much to Chloe's delight. The colours are a bit deeper than the original but that was what I had to work with. I don't really want to get a massive stash of wool here in Perth and it is already pretty decent.
I followed the Six Little Mice pattern again, using a picture of Hootabelle to change the colours where necessary. For the headband I just worked a flat band doing sc's back and forth until it was the right length. For the butterfly I followed a suggested page by The Craft Room (she has made very cute Hoot and Hootabelle) at Little Birdie Secrets. It was a bit tricky, especially to add a white sc row around the edge, but it turned out OK.
So here she is:
The heart dots are glued on felt and lasted all of 30min of being played with so I've left them off.
I followed the Six Little Mice pattern again, using a picture of Hootabelle to change the colours where necessary. For the headband I just worked a flat band doing sc's back and forth until it was the right length. For the butterfly I followed a suggested page by The Craft Room (she has made very cute Hoot and Hootabelle) at Little Birdie Secrets. It was a bit tricky, especially to add a white sc row around the edge, but it turned out OK.
So here she is:
26 May 2013
Crochet Hoot
I have finished Hoot! Using a pattern from Six Little Mice I whipped him up in no time (well, it actually took a while as the body is 81 stitches around and that's a lot of single crochets). Pretty happy with how he turned out. Next - Hootabelle.
![]() |
| Finished Hoot |
20 May 2013
Crochet Gizmo
I was inspired by family recently to attempt to make a Mogwai. For those who haven't seen the film 'Gremlins' a Mogwai is a furry little creature that can transform into evil little monsters if you don't follow the rules. Anyway....I couldn't find a good crochet pattern for a Mogwai that I liked. In the end I found a cute picture of one with a partial pattern and I ended up making lots of it up!
I am in the process of typing up the pattern that I made up. I have taken bits from the original, but changed lots as I think mine is a bit bigger than the original. I'll post the pattern when I get it done.
EDIT: Here is the pattern I used. If you use it in conjunction with the original post it may actually make sense. I apologise if it's hard to read, but this is my first crochet pattern and I am new to amigurumi. If anything doesn't make sense please let me know and I will try to explain. The head is just plain tricky and I did a bit to just make it work. I have tried to add explanations in the pattern too. First time linking a PDF as well so let me know if there are any issues.
Gizmo Crochet Pattern
I am in the process of typing up the pattern that I made up. I have taken bits from the original, but changed lots as I think mine is a bit bigger than the original. I'll post the pattern when I get it done.
EDIT: Here is the pattern I used. If you use it in conjunction with the original post it may actually make sense. I apologise if it's hard to read, but this is my first crochet pattern and I am new to amigurumi. If anything doesn't make sense please let me know and I will try to explain. The head is just plain tricky and I did a bit to just make it work. I have tried to add explanations in the pattern too. First time linking a PDF as well so let me know if there are any issues.
Gizmo Crochet Pattern
![]() |
| Finished Crochet Mogwai |
![]() |
| Before arms and legs |
![]() |
| Back - next time I wouldn't do the white as high up the back |
| Top |
![]() |
| Side/top view to show the hands |
12 Oct 2012
Little crochet squares
The squares are made up like this:
5mm hook
DC - Double crochet
ch - chain
Sl st - slip stitch
- Magic ring, chain 3,
- In magic ring: 2 DC, ch 1, (3 DC, ch1) 3 times. Pull magic ring tight and join to first ch3
- Chain 3, turn
- Next row: 2DC in corner next to ch3, ch1, 3DC in same corner, ch1, *(3DC, ch1, 3DC) in next corner, ch1. Repeat from * 2 more times to complete the square. Sl st to join to the ch3 and finish.
Now I know that is not as neat as normal crochet patterns as I'm not used to writing them out, but I hope it makes sense.
Newborn Owl Hat
I couldn't resist this pattern from Repeat Crafter Me. There are so many gorgeous ideas and patterns on this site so it is well worth a look. I already had some wool I had stocked up on a while back and never used which was nice and fluffy and soft. It is just too cute but of course I don't have anyone to give it to. Another one for Beanies for Babies I think.
The hat took 1 evening to make up including making the eyes. I had to get some wool for the beak and some big black buttons so 2 nights total.
18 Aug 2012
Another Brain Waves Beanie
Hubby and son love wearing their Brain Waves beanies so much that I couldn't resist making another one for Beanies for Babies in some girly colours. IT'S SOOOOO CUTE! It's one of those things that I don't want to give away but really don't need. I tried to convince Chloe that she needed another hat, but she told me I should give it to a little girl who needs it. Gotta love her.
27 Jun 2012
Brain Waves Beanie
I recently picked up a crochet needle again to see if I liked it better than knitting, and for some things it is great. Top of the list has to be beanies as it is much faster to whip one up, and easier to work in a round. I saw this pattern by Playin' Hooky Designs and had to do it. I love that it has an adult and childs pattern as I am hopeless at adjusting patterns. I already had some black and cream wool so just got some red for the alternate waves (red and black are Canterbury colours).
Hubby keeps saying that he feels like he's wearing a tea cosy, but then insists that he really likes it. I must admit that the 2 boys look really cute when they wear them together, and Alex knows that he has the same hat as daddy and loves it.
Subscribe to:
Posts (Atom)