24 Oct 2010

Quiet Book - Cover

I thought I should make something to put my quiet book pages in so made a cover for them. I have all this lovely girly fabric but managed to restrain myself in case #2 is a boy. I'm sure it wouldn't have really been as issue, but I am hoping that both kids will get some use out of it. After a rummage I came up with the fabric I used to make the fabric high chair. I thought this would work well as it is a sturdy, durable fabric and would be easy to find with the bright yellow.

I started by cutting out 2 rectangles that allowed an extra 3cm at the top and bottom and sides of the pages, as well as allowing 6cm for the 'spine'.

From the yellow fabric I also cut a smaller square that will serve as a pocket on the back for bits of notepaper or even holding pieces from the book if necessary.

I went to sew the pieces together a couple of times before stopping to realise that a) I need to sew the pocket on first and b) I need to do the buttonholes in the spine first. The buttonholes will have metal rings through them (the kind you get at a stationary store) so that the pages can be removed and shared amongst kids. I am so lucky to have and awesome buttonhole feature on my machine. I just found a tiny button to use as a guide and they were all done! I also used this same button to add buttonholes to my already finished pages in the corresponding spots.

Pocket and spine

Then came sewing the pieces together, right sides facing and leaving a gap to turn in the right way. I also top stitched around the edge to make the edges sit well. Then I sewed two lines down the middle 6cm apart to form the spine of the book. This will hopefully give it a bit more shape when the pages are in it. The cover is a bit boring at the moment but when I get some inspiration I'll just use some Heat n' Bond and add something fun.

Cover

Next step is get onto finishing the pages. I'm halfway through an apple tree page and have a page planned with a backpack and a small zip, and a shoe that laces up.

19 Oct 2010

Baby booties

I got my latest Spotlight mailer and fell in love with these baby booties. I liked the idea that one of the styles had ribbon around the ankle so you could do them up as tight as necessary.

I started with the ballet style ones in pink:

They were quite easy to do, and not too fiddly.

I have one blue one made in the button style and will post a pic of that one when done. The button ones are trickier as you have to rejoin the wool at a couple of places at the end and I haven't gotten that perfected yet. I also found the part of the pattern where you have to cast on extra stitches for the ankle pieces a bit difficult to decipher, though what I ended up doing worked.

Another Dress

Got some cheap denim at a fabric sale - yay. Decided to make another dress, and wanted to base it on one I saw in a store that had some cute cotton under the denim.

I started thinking that I would just line the denim with the cotton, but after some thinking changed my mind and made the dress reversible. So I made the dress up in each fabric and sewed them together - easy! I left the cotton a bit longer in the hem so that it shows under the denim when the denim is facing out.

I got pink and blue buttons and meant to have them on the contrasting sides, but my mind is so muddled with being pregnant (best excuse ever) that I forgot to do this and couldn't be bothered changing it.


Needs an iron, but that doesn't get done much in our house, and it will be wrinkly again so quickly...

PJ's

Chloe has outgrown another pair of PJ's so rather than buying more I thought I'd get a pattern and make some. Took a while to find a pattern that was from age 1 up, but finally found a Kwik Sew one that goes from age 1-4yrs so I'll get lots of use out of it.

Looked easy enough thought the collar was a bit fiddly (I haven't done a collared shirt before). Happy with the result in this cute purple cotton with stars, and got some cute matching buttons.


11 Sept 2010

Quiet book - page 5: Flower Pot

I felt like I was on a roll with the quiet book and whipped up this page really quickly. This page is to practice with buttons, with the flowers able to be unbuttoned.

Easy to do - started by cutting out the flowers and attaching fusing to the back, and again doing a blanket stitch around them to keep them tidy. I then used my handy buttonhole foot to create the buttonholes in the middle of the flowers. I chose buttons that didn't take up too much room as the buttonhole needed to fit on the flower with room to spare.

For the stalks I used some green ribbon which I first hand stitched to the flower, then I sewed the other end to the page after placing them where I wanted them. The flower pot was sewn over all of this.

Final step was to sew on the buttons. I pinned the flower stems down first so that the buttons were in the right place and....voila!

6 Sept 2010

Soft Baby Book

This is something from the 'Celebrate the Boy' crafts and is from thimblythings blog. There is a tutorial to follow along. It is a cute wee fabric book that looks like much less work than the quiet book I'm doing for Chloe, primarily as it has no 'working' parts. I decided to make this for a friends boy who is about 9 months old as I thought it would be good for his age.

On hunting through my craft caddy I found some Heat 'n Bond I had bought a while back. I can't believe I haven't used it yet as it is the best thing ever, and perfect for this book. Shame I can't remember where or when I got it.

I chose to change some of the pictures to suit my friends boy. He is into lions so my lovely husband designed one for me. I changed the ladybird to a shark to be a bit more boy-ish, and the car to a truck. I also changed the sippy cup to an apple as I'm not sure he would recognise the cup.

Here is the lion in progress:
With the Heat 'n Bond attached to the fabric (it doesn't work on felt by the way).

And the pages with the fabric attached ready to be sewn:

I sewed around most of the pieces just to make sure they didn't come off in little hands.

Then, following the tutorial, I sewed it all together into a little book. Hope he has fun with it. Of course I forgot to take pics of the finished product before I gave it to him, but I'm sure I'll make another one sometime.

4 Sept 2010

Merino swaddle

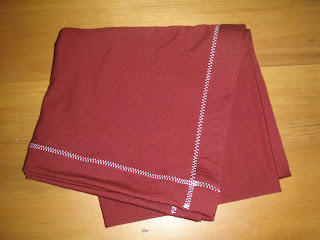
I finally finished the merino swaddle that I had cut out before I made the dress for Chloe. Happy with the result.

It took a little while to turn the edges and get them all the same, but as it is just going to be wrapped around baby I'm not too worried if it's a perfect square.

I started with it being 1m x 1m and then folded the edges twice. I did a straight stitch around the whole thing, about 1/4" from the top fold, to keep it all in place.

Then I changed to the contrasting thread and did a fancy stitch along each edge to catch that top fold and keep it flat.

Even though this will be a summer baby, I have a feeling I will be using this as a blanket a lot.


Edited to add some more pics of the process while I was making a second one.