6 Sept 2010

Soft Baby Book

This is something from the 'Celebrate the Boy' crafts and is from thimblythings blog. There is a tutorial to follow along. It is a cute wee fabric book that looks like much less work than the quiet book I'm doing for Chloe, primarily as it has no 'working' parts. I decided to make this for a friends boy who is about 9 months old as I thought it would be good for his age.

On hunting through my craft caddy I found some Heat 'n Bond I had bought a while back. I can't believe I haven't used it yet as it is the best thing ever, and perfect for this book. Shame I can't remember where or when I got it.

I chose to change some of the pictures to suit my friends boy. He is into lions so my lovely husband designed one for me. I changed the ladybird to a shark to be a bit more boy-ish, and the car to a truck. I also changed the sippy cup to an apple as I'm not sure he would recognise the cup.

Here is the lion in progress:
With the Heat 'n Bond attached to the fabric (it doesn't work on felt by the way).

And the pages with the fabric attached ready to be sewn:

I sewed around most of the pieces just to make sure they didn't come off in little hands.

Then, following the tutorial, I sewed it all together into a little book. Hope he has fun with it. Of course I forgot to take pics of the finished product before I gave it to him, but I'm sure I'll make another one sometime.

4 Sept 2010

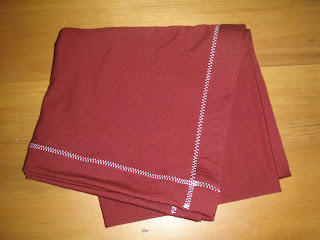
Merino swaddle

I finally finished the merino swaddle that I had cut out before I made the dress for Chloe. Happy with the result.

It took a little while to turn the edges and get them all the same, but as it is just going to be wrapped around baby I'm not too worried if it's a perfect square.

I started with it being 1m x 1m and then folded the edges twice. I did a straight stitch around the whole thing, about 1/4" from the top fold, to keep it all in place.

Then I changed to the contrasting thread and did a fancy stitch along each edge to catch that top fold and keep it flat.

Even though this will be a summer baby, I have a feeling I will be using this as a blanket a lot.


Edited to add some more pics of the process while I was making a second one.

30 Aug 2010

Quiet book - page 4: Ice Cream colours

So this page is for colours. I first saw this idea on camillescasa and really liked it. I used my own design for the ice cream and cone but there are templates available on her page.

I had some scraps of leather that I had picked up so decided to use one for the ice cream cone. I scored the leather on a criss cross design to give the cone some detail.

The ice cream scoops are felt with fusing on the back, and hand stitched blanket stitch around the edge to help keep these tidy. There are 3 pieces of the fluffy half of velcro above the cone to put the scoops on.

I was going to have some more velcro to hold the spare scoops but decided to just sew a little pocket down the bottom to store them in.


In hindsight I would have put the cone a bit lower but I think it still works. Now if only Chloe could learn which colour is which...

21 Aug 2010

Getting fancy - tag cloths and cubes

After getting the new machine I figured I needed to play a bit. Here are a few tag cloths and rattle cubes that I had a bit of a play with.

For the tag cloths I tried using satin instead of fleece and some more neutral fabric colours. Also, there are heaps of cute stitches so I tried a few different ones for the final top stitching.

For the cubes, I picked up some cute fat quarters with some contrasting patterns, which are good for little babies. I also found a much better bell for the inside that you can hear better when inside the stuffing.

Quiet book - page 3: Shapes

After doing a couple of very involved pages as the first 2, I wanted to do something a bit easier for the next 2 pages. Shapes seemed to be easy so I started on that.

I traced around 6 shapes onto cardboard from Chloe's Tupperware Shape sorter - circle, square, triangle, cross, star and pentagon. I used the templates to cut out 2 of each shape from material and ironed these onto some fusing to give them some strength. Onto one of each of the shapes I sewed a square of velcro (the scratchy side) before sewing the 2 pieces of each shape together with a zigzag stitch.

The fluffy half of the velcro was sewn onto the calico. To create the shape to match the piece with, I painted the shape onto the calico around the velcro. To finish, even though Chloe can't read yet, I sewed the names of the shapes under each one. A bit of fusing on the back of the calico will help little fingers to pull off the shapes.


Next page - colours.

Merino Dress

I was let into the secret of an awesome fabric outlet store where you can get Merino at a good price. I picked up 1.5m of two different colours for a steal and am still trying to use it all.

The first thing I did was cut out a square from a red wine coloured piece which I will edge and use as a baby swaddle. With the leftover material I wanted to make a little shift dress for Chloe.

I was able to pick up a super easy pattern for $5. I probably could have just made up a pattern, but I wanted to use the merino well. The result is very cute and will work well as a winter/spring dress.

Beanie

I was given a pattern for a baby beanie which I wanted to knit for baby #2 to wear at the hospital. The trouble was that I didn't know what size to start with out of the 6 options, so I thought I'd start small and go from there. The blue means nothing, just that I had a lot of blue wool. Second go (the cream one) is a much better size. Both are very cute though.

The blue hat is the smallest size on the pattern. The green hat next to it is the one my daughter wore home from the hospital.

This is the second try. It is the same size as the green hat above.